Is it possible to find someone who doesn’t like milkshakes? The world of beverages is extremely diverse and full of creativity due to the birth of many new drinks, unique combinations of ingredients, and processing methods. Among them, milkshakes are popular with many diners, especially young people. Nowadays, when we look at the menus of bars, cafes, etc., we often see milkshakes. Before we start learning how to draw a milkshake, let’s take a moment to understand the origin of milkshakes. A milkshake is a mixture of ice cream, milk, chocolate, fruit, and vanilla syrup.
Originating in America in 1885, a milkshake at that time was an adult drink consisting of eggs and whiskey. Then the blender was invented, and by 1950, milkshakes had become popular and appeared on the menus of restaurants, bars, or even food stalls, served in large glasses with straws. An umbrella, or strawberry, is placed on the side of the glass. When making this kind of milk, never add ice to the milkshake. Ice will break down the rich taste of milk and cream. Around the world, milkshakes are enjoyed in many different and quite unique ways. In Singapore, people use cakes to top the milkshake to enhance the flavor. Some cafes in the US serve milkshakes with traditional hamburgers, potatoes, and cocktails. The combination of milkshake with other cakes, fruits, and toppings makes the milkshake cup massive in size, and the layers of cake stacked on top of each other look very strange and delicious.
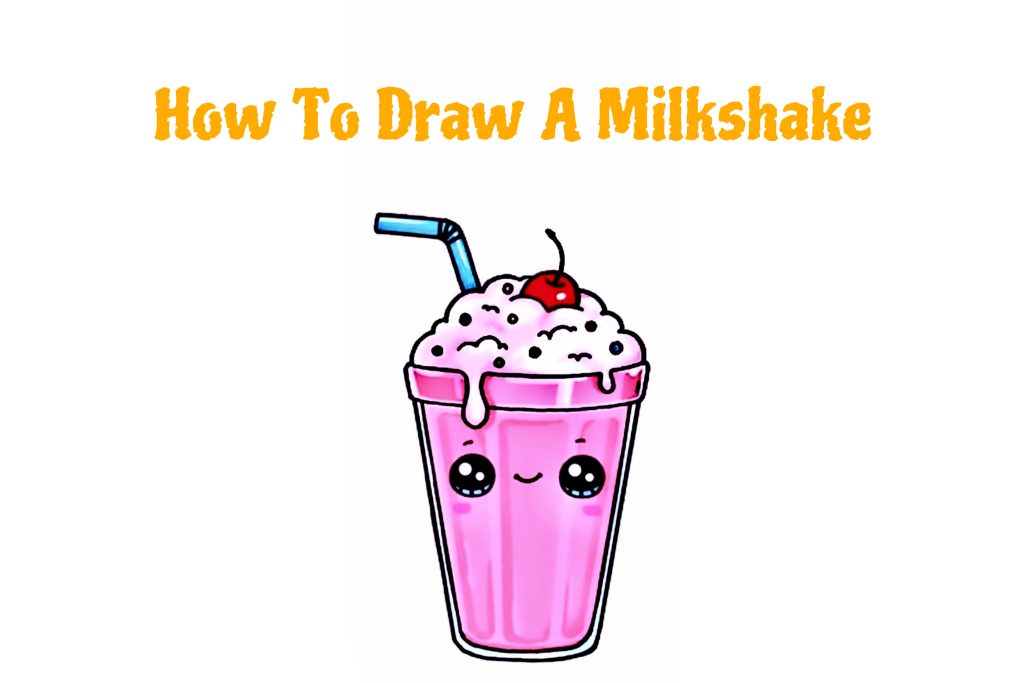
How To Draw Milkshake
Ensure you have the following supplies ready:
Pencils: A variety of graphite pencils for sketching and shading.
Erasers: Regular erasers for precision.
Paper: High-quality paper or a sketchbook.
Reference images: Gather images of the character.
Coloring tools: use colorful crayons to bring the character to life
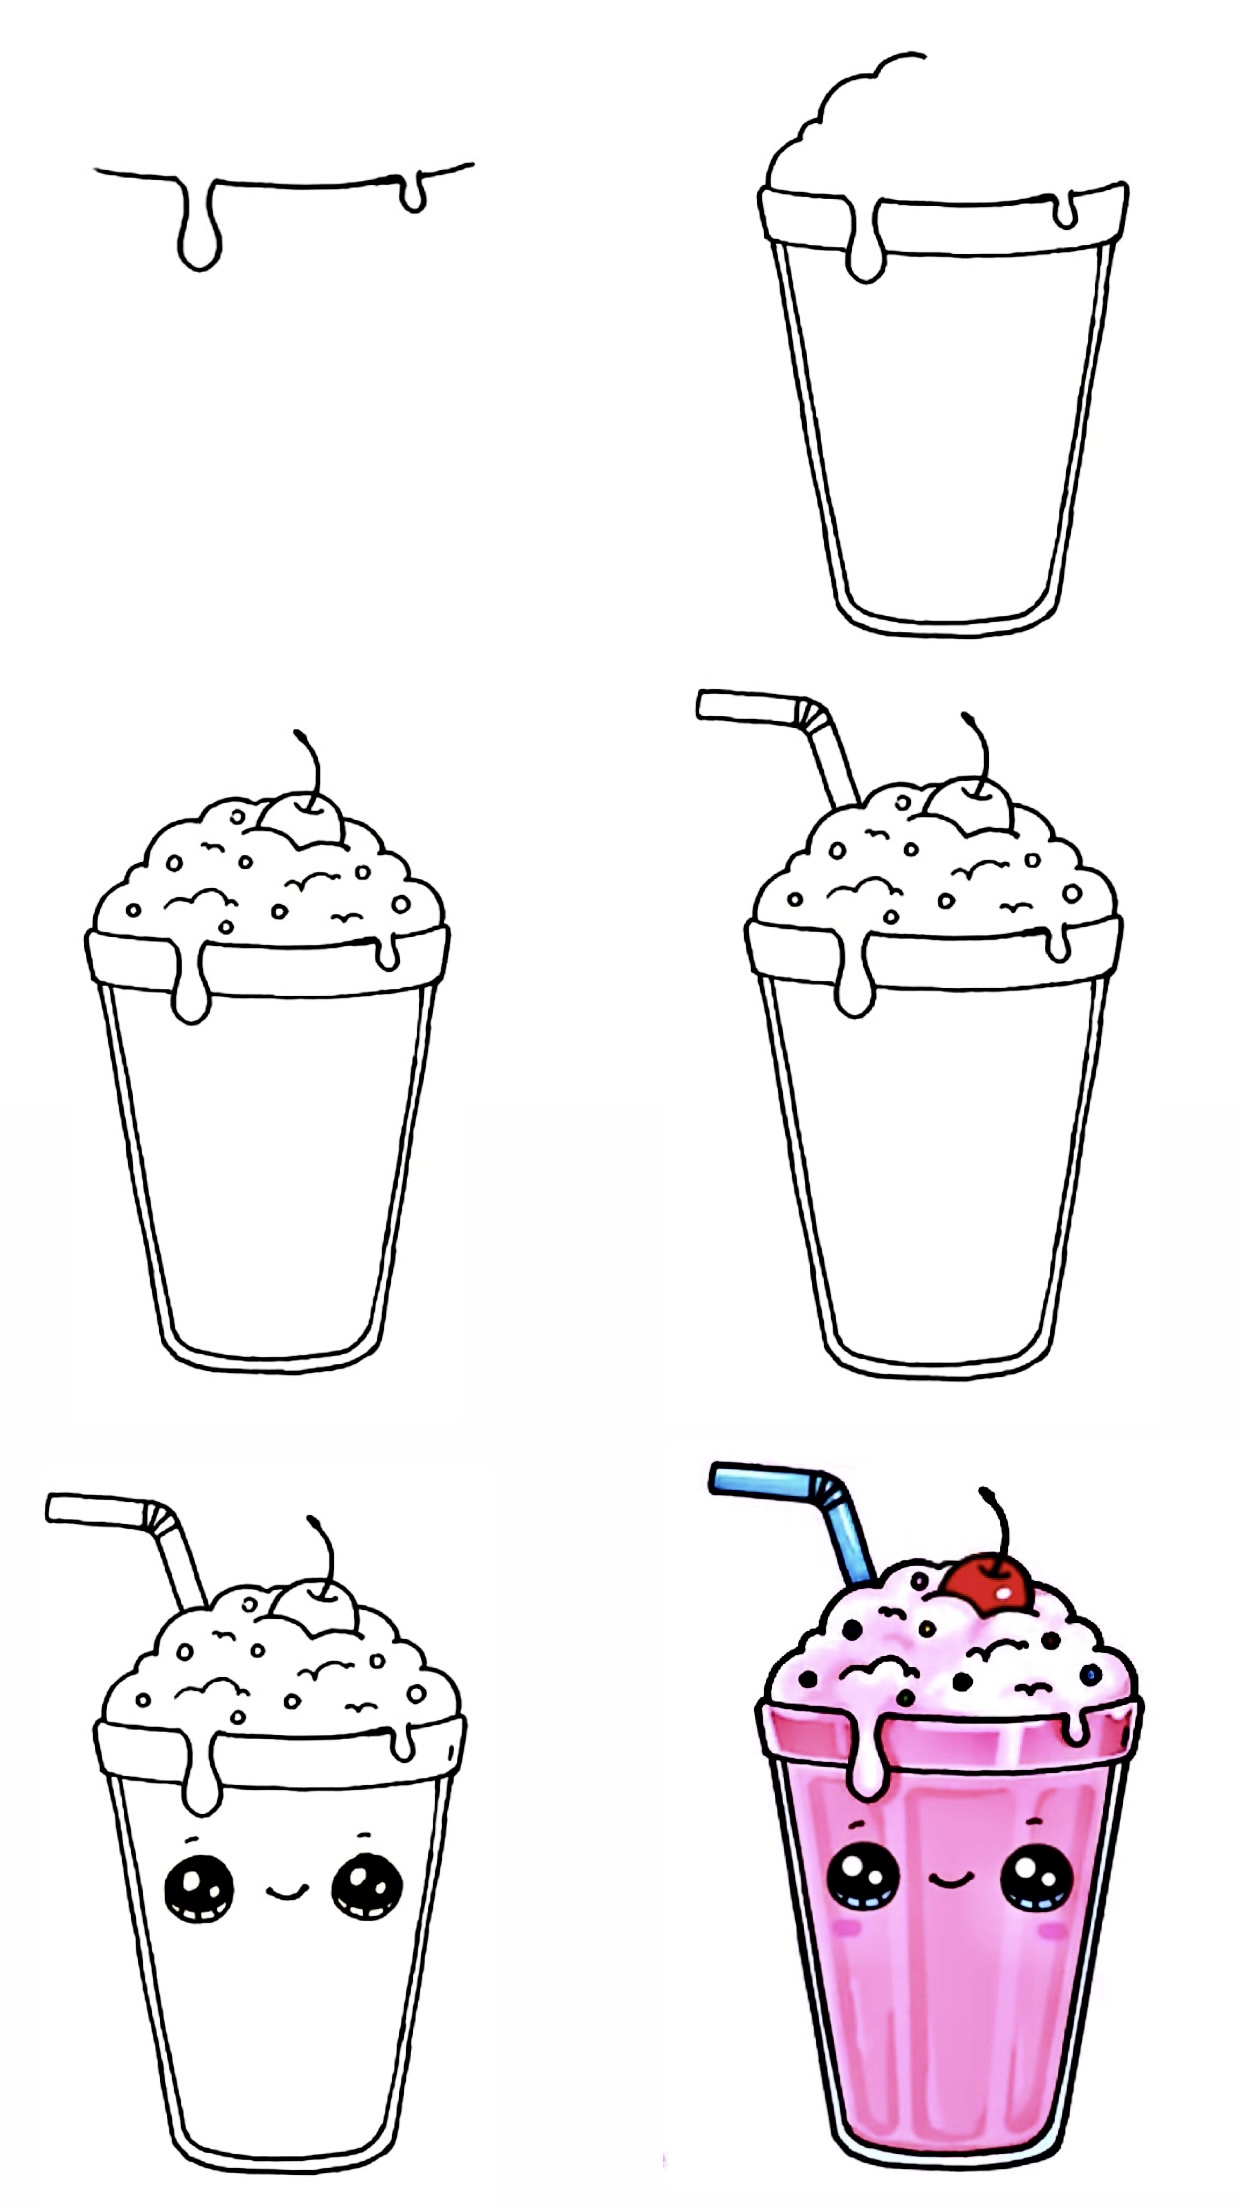
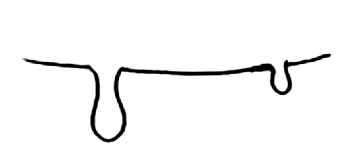
First, we’ll draw the top of the milkshake cup. This will be a curve with one to two teardrop shapes added. Imagine a milkshake cup covered with whipping cream so much that the cream runs down the sides of the cup, creating the undeniable appeal of this delicious drink.
Step 2 – Complete The Glass And Add Frothy Top
Milkshake Drawing Step 2
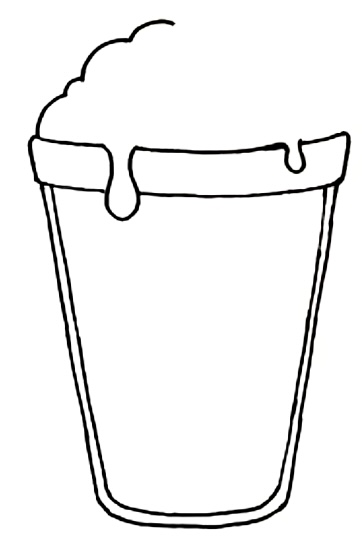
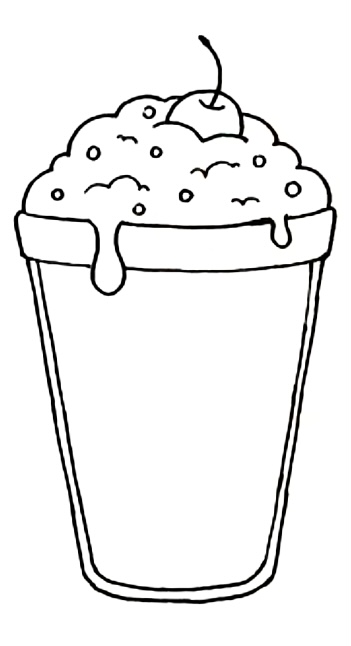
In the second step, we will draw the cup. On both sides of the glass, draw angled lines to create thickness. This will make the glass look more realistic. Connect the lines in the upper part using a curved line, following the shape of the glass. Draw diagonal lines from the sides of the glass to form the bottom. Round the bottom of the glass and connect it with diagonal lines. Once you’ve drawn the cup, draw the top of the milkshake foam. Starting at the rim of the glass, draw a series of curved lines to form a pile of milkshake foam. Make it as big and fluffy as you want! It looks like we’re drawing clouds in the sky.
Step 3 – Adding A Cherry
Milkshake Drawing Step 3
To complete the whipping cream part of the milkshake, draw small, curved lines all over. This will make it look more appetizing! You can also add custard seeds by drawing small circles. Feel free to get creative and spread them wherever you want. Of course, no milkshake is complete without cherries! Draw a small circle above the whipping cream. Remember to add a stem to add realism to your drawing
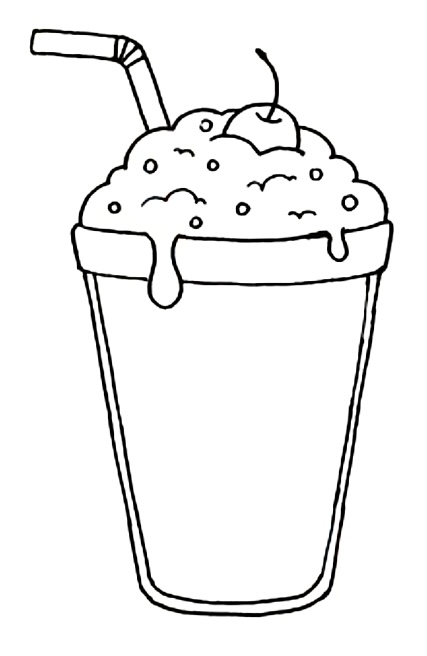
Step 4 – Drawing The Straw
Milkshake Drawing Step 4
Now let’s draw the straw. Start by drawing two angled lines from the top of the milkshake. Curve the lines to create the shape of the straw. Connect curved lines to create folds and draw two straight lines inside the tube to detail the straw.
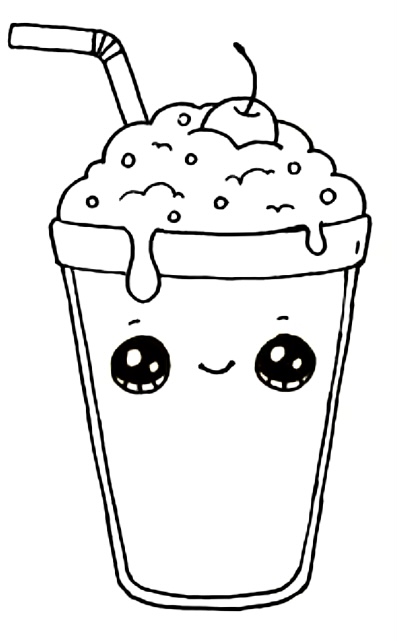
Step 5 – Expressive Facial Features
Milkshake Drawing Step 5
To liven up your milkshake, let’s draw two circles to create big, adorable eyes. Add highlights to the circles to make them sparkle. Draw a curved line below each eye to create the eyelids. Darken the top of the eye to create depth and add a lovely expression. Add a small, curved line above each eye to create the eyebrows. In the middle, draw a small, curved line to create a sweet and cheerful smile. This will make your milkshake look friendly and appealing.
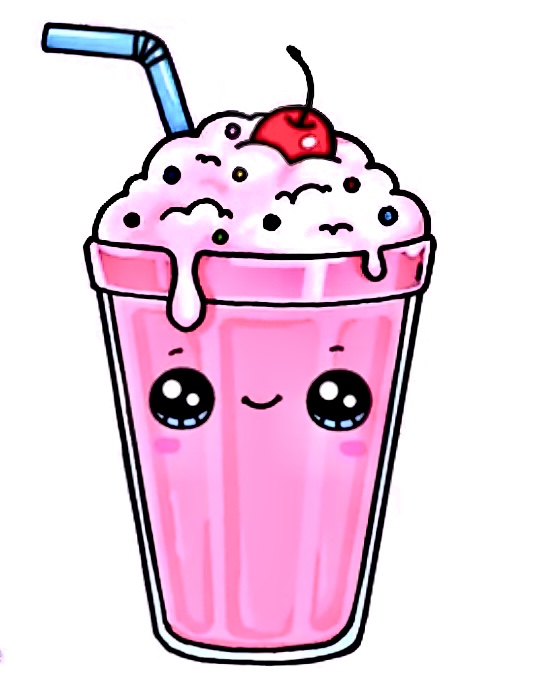
Step 6 – Coloring Milkshake
Milkshake Drawing Step 6
Now that we’ve drawn Milkshake’s face, it’s time to bring Milkshake to life! Milkshake has flavors such as fruit, green tea, chocolate, syrup, caramel, etc. That’s why milkshakes come in so many colors. Jorz.art’s milkshake cup is pink because Jorz.art chose strawberry flavor. Likewise, if you want your milkshake to taste orange, you can color it orange. Be creative!
Your Milkshake Is Complete!
Congratulation! You have successfully drawn a delicious milkshake. With the rich, sweet, fragrant taste of milk and cream, the flavors blending together, and the eye-catching, colorful appearance, milkshakes easily conquer diners, especially young people. Jorz.art has guided you through the process, making it simple and fun. Remember that you can customize your milkshake by adding different flavors or toppings. Experiment with colors and designs to create your own unique look. Don’t be afraid to explore and get creative with your drawings!
Tips On How To Draw A Milkshake
In addition to details like cherries, you can optionally add delicious toppings to your own milkshake. You can add grapes, cookies, oreos, etc.—anything you like!
FAQ On How To Draw A Milkshake
Can I draw different shapes of a milkshake?
Creativity is unlimited. Instead of drawing a traditional cylindrical cup, you can refer to the shapes of cups online or design your own unique shape that you know.
Can I draw different faces for my milkshake?
Of course, you can absolutely create faces with different expressions to create diversity in your drawing and show off your own artistic talent. You don’t even need to draw any faces for any milkshakes if you want.
Is it possible to find someone who doesn’t like milkshakes? The world of beverages is extremely diverse and full of creativity due to the birth of many new drinks, unique combinations of ingredients, and processing methods. Among them, milkshakes are popular with many diners, especially young people. Nowadays, when we look at the menus of bars, cafes, etc., we often see milkshakes. Before we start learning how to draw a milkshake, let’s take a moment to understand the origin of milkshakes. A milkshake is a mixture of ice cream, milk, chocolate, fruit, and vanilla syrup.
Originating in America in 1885, a milkshake at that time was an adult drink consisting of eggs and whiskey. Then the blender was invented, and by 1950, milkshakes had become popular and appeared on the menus of restaurants, bars, or even food stalls, served in large glasses with straws. An umbrella, or strawberry, is placed on the side of the glass. When making this kind of milk, never add ice to the milkshake. Ice will break down the rich taste of milk and cream. Around the world, milkshakes are enjoyed in many different and quite unique ways. In Singapore, people use cakes to top the milkshake to enhance the flavor. Some cafes in the US serve milkshakes with traditional hamburgers, potatoes, and cocktails. The combination of milkshake with other cakes, fruits, and toppings makes the milkshake cup massive in size, and the layers of cake stacked on top of each other look very strange and delicious.
How To Draw Milkshake
Ensure you have the following supplies ready:
Pencils: A variety of graphite pencils for sketching and shading.
Erasers: Regular erasers for precision.
Paper: High-quality paper or a sketchbook.
Reference images: Gather images of the character.
Coloring tools: use colorful crayons to bring the character to life
First, we’ll draw the top of the milkshake cup. This will be a curve with one to two teardrop shapes added. Imagine a milkshake cup covered with whipping cream so much that the cream runs down the sides of the cup, creating the undeniable appeal of this delicious drink.
Step 2 – Complete The Glass And Add Frothy Top
Milkshake Drawing Step 2
In the second step, we will draw the cup. On both sides of the glass, draw angled lines to create thickness. This will make the glass look more realistic. Connect the lines in the upper part using a curved line, following the shape of the glass. Draw diagonal lines from the sides of the glass to form the bottom. Round the bottom of the glass and connect it with diagonal lines. Once you’ve drawn the cup, draw the top of the milkshake foam. Starting at the rim of the glass, draw a series of curved lines to form a pile of milkshake foam. Make it as big and fluffy as you want! It looks like we’re drawing clouds in the sky.
Step 3 – Adding A Cherry
Milkshake Drawing Step 3
To complete the whipping cream part of the milkshake, draw small, curved lines all over. This will make it look more appetizing! You can also add custard seeds by drawing small circles. Feel free to get creative and spread them wherever you want. Of course, no milkshake is complete without cherries! Draw a small circle above the whipping cream. Remember to add a stem to add realism to your drawing
Step 4 – Drawing The Straw
Milkshake Drawing Step 4
Now let’s draw the straw. Start by drawing two angled lines from the top of the milkshake. Curve the lines to create the shape of the straw. Connect curved lines to create folds and draw two straight lines inside the tube to detail the straw.
Step 5 – Expressive Facial Features
Milkshake Drawing Step 5
To liven up your milkshake, let’s draw two circles to create big, adorable eyes. Add highlights to the circles to make them sparkle. Draw a curved line below each eye to create the eyelids. Darken the top of the eye to create depth and add a lovely expression. Add a small, curved line above each eye to create the eyebrows. In the middle, draw a small, curved line to create a sweet and cheerful smile. This will make your milkshake look friendly and appealing.
Step 6 – Coloring Milkshake
Milkshake Drawing Step 6
Now that we’ve drawn Milkshake’s face, it’s time to bring Milkshake to life! Milkshake has flavors such as fruit, green tea, chocolate, syrup, caramel, etc. That’s why milkshakes come in so many colors. Jorz.art’s milkshake cup is pink because Jorz.art chose strawberry flavor. Likewise, if you want your milkshake to taste orange, you can color it orange. Be creative!
Your Milkshake Is Complete!
Congratulation! You have successfully drawn a delicious milkshake. With the rich, sweet, fragrant taste of milk and cream, the flavors blending together, and the eye-catching, colorful appearance, milkshakes easily conquer diners, especially young people. Jorz.art has guided you through the process, making it simple and fun. Remember that you can customize your milkshake by adding different flavors or toppings. Experiment with colors and designs to create your own unique look. Don’t be afraid to explore and get creative with your drawings!
Tips On How To Draw A Milkshake
In addition to details like cherries, you can optionally add delicious toppings to your own milkshake. You can add grapes, cookies, oreos, etc.—anything you like!
FAQ On How To Draw A Milkshake
Can I draw different shapes of a milkshake?
Creativity is unlimited. Instead of drawing a traditional cylindrical cup, you can refer to the shapes of cups online or design your own unique shape that you know.
Can I draw different faces for my milkshake?
Of course, you can absolutely create faces with different expressions to create diversity in your drawing and show off your own artistic talent. You don’t even need to draw any faces for any milkshakes if you want.
Hi, I'm Stexxa, you can call me Stex. I currently work in digital marketing, website design, and content creation for the website Jorz.art. We hope that our Website will bring the value you are looking for.
Is it possible to find someone who doesn’t like milkshakes? The world of beverages is extremely diverse and full of… View More